In a study published in 2012, the American Alpine Club AAC found that three reasons are responsible for almost 75% of all rappelling accidents:
- Anchor failure
- No or inadequate backup
- Rappelling off the end of the rope
Accident statistics from the German alpine club (VDBS) show similar results. The thing is: With a few simple behavioral rules, most of these accidents could have been prevented. Stay safe and start implementing these rules into your everyday routine. Today!
Mistake #1: No stopper knot at the end of the rope
I have heard all sorts of excuses, why a stopper knot is not necessary at all or why a knot in one end is sufficient:
- Both ends have the same length
- I saw the ropes reaching the next anchor
- I will take care while rappelling
- etc.
However, murphy's law has no mercy. I have this story in mind where 2 climbing duos went climbing with the same rope type (cannot find the link right now, will post it when I refind it). During lunchtime, they mixed up the ropes by accident. Point is, the ropes of the second group had already been shortened multiple times and the middle marker was not in the middle anymore. But the climbers of the first group unaware of this, assuming they were climbing with their own rope. Next thing, they climbed a route that is too long for the shortened rope and the end of the rope slipped through the belay device.
This is an accident pattern that happens so often and yet it is so easy to avoid:
| ⚠️ Rule #1 | Always tie a stopper knot in both ends of the rope(s). |
Mistake #2: Not using a backup knot
Things can go wrong during rappelling that could take you out of control: A rock could hit you. You might slip off the wall in difficult terrain. Or you need to free up your hands to free the rope when it gets stuck between rocks.
That is why a backup knot is essential, normally in the form of a friction hitch installed at the lower end of the rope. During normal rappelling, this friction hitch is loosely shifted downwards with your brake hand. However, in case you let go of the rope, the friction hitch will bite, basically replacing your brake hand and therefore bending the rope in the belay device sufficiently to prevent you from falling down the rope.
Omit the backup knot, and you would fall all the way down till you either hit the floor or catch the stopper knot at the end of the rope (unless you made mistake #1, too). In case it would be a painful experience. I refrain from linking to it, but if you need to see this in action, you will find some examples on Youtube if you search for "rappelling accident".
| ⚠️ Rule #2 | Always use a friction hitch to backup your belay system. |
| ⚠️ Pro tip | When installing the rappel system, mount the friction hitch first and pull slack from the rope below. This prevents the rope weight to drag everything down and you have a much more relaxed experience of threading the rope through the belay device. |
Mistake #3: Not extending the rappel system
The best backup knot does not help if it is done wrongly: One thing that could happen is that your friction hitch runs into you belay system, basically rendering both your belay device and your backup knot useless.
One early method to avoid this was to attach the friction hitch you one of the leg loops in order to create the necessary distance between the friction hitch and the belay device. However, this method still has the possibility to fail in case you raise the leg too high. Therefore this method is not recommended anymore.
The proper method to avoid the friction to hitch to run into the belay system is to extend the belay system. You can do this simply by using a sling, knotted at the right length. Alternatively, there are also special-purpose products on the market which are specifically meant as an extension for the rappel system. Normally, they are referred to as a personal anchor system (PAS).
| ⚠️ Rule #3 | Always extend your rappel system. Make sure that your friction hitch is not allowed to run into your belay device. |
Also, check out this excellent video from Dale Remsberg and Olivia Race (via Outdoor Research). Nothing else to be said when it comes to rappel extensions.
Mistake #4: Not testing your system before removing your personal anchor
This can go wrong while installing the rappel system: You might not properly thread the rope into the belay device. Or you might not clip yourself properly into the belay carabiner. You think:
This never happens to me!
Think again. It has happened. A lot. Also to very experienced climbers.
So here is how to load test your rappel setup:
- Fully install your rappel system
- Shift the belay device all up toward the anchor point
- Push your friction hitch up as well until it bites
- Load the system by sitting into your rappel system
- Verify that your tether (personal anchor) has slack.
If not, either your tether is too short or your belay system not close enough to the anchor. - Double-check the setup: Everything at the right place? All carabiner gates locked?
- Only now you can remove your tether (personal anchor) and you can start rappelling
| ⚠️ Rule #4 | Always load test your rappel setup. |
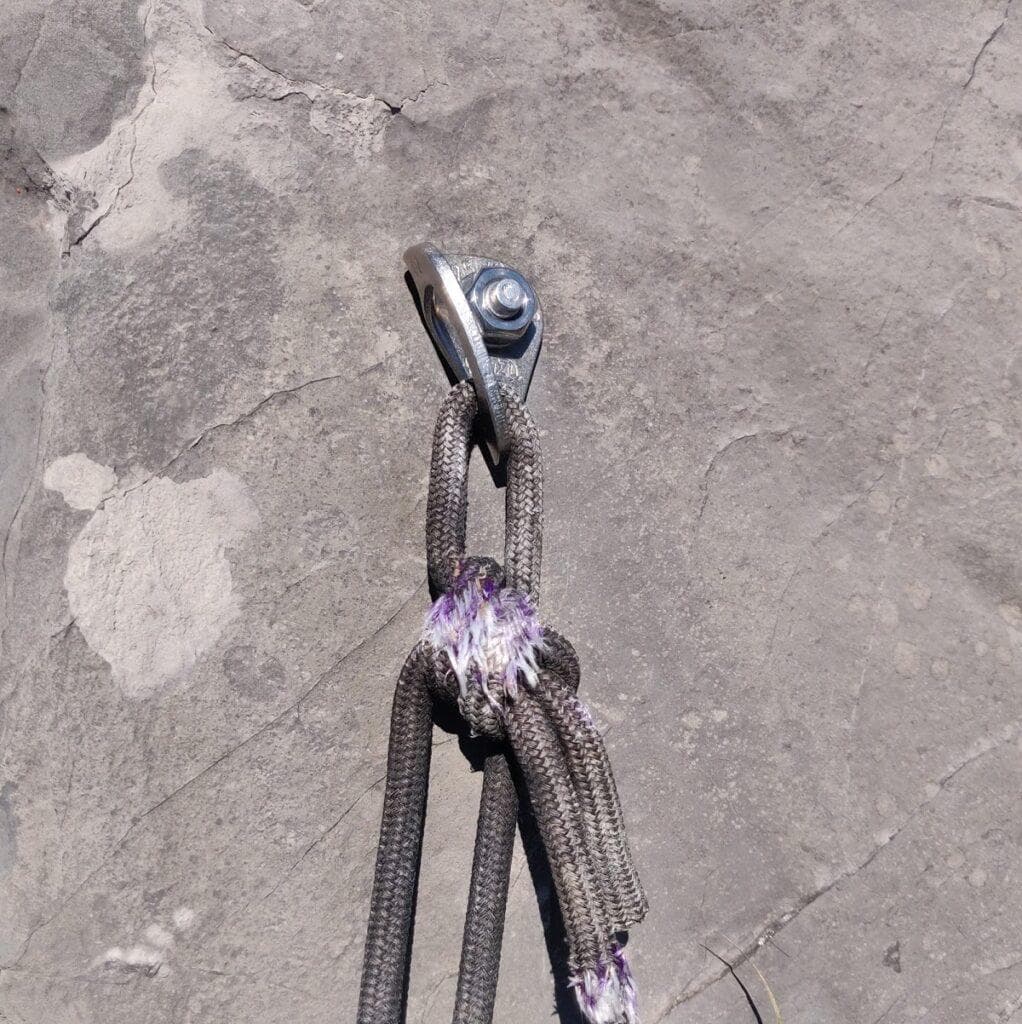
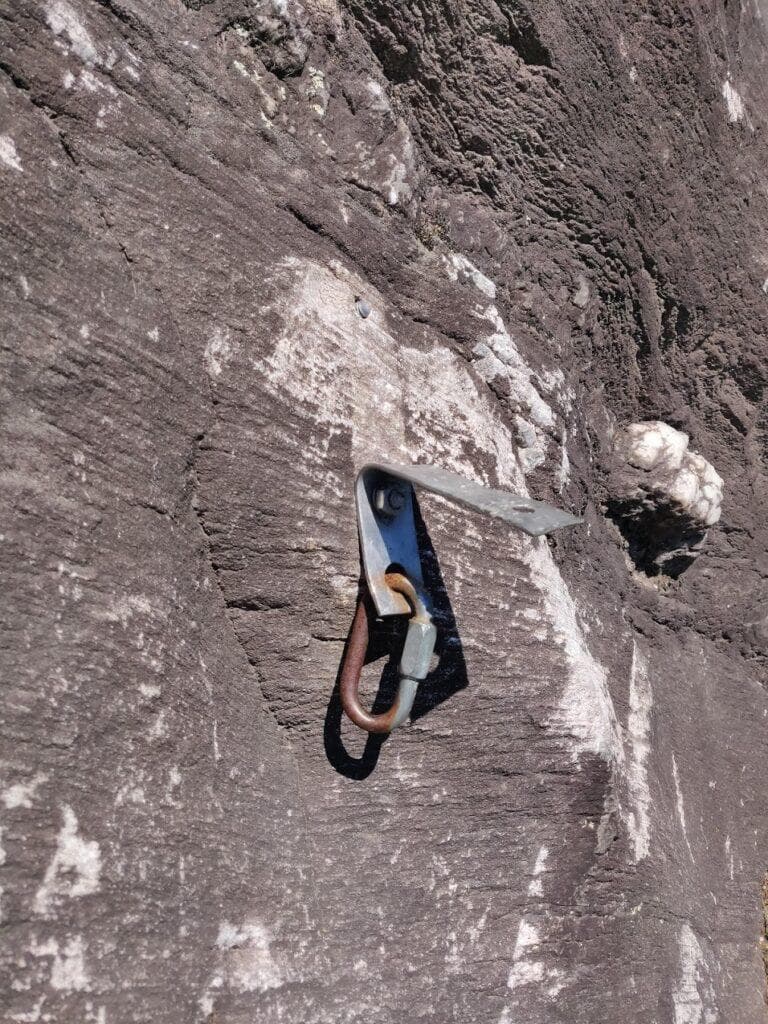
Mistake #5: Rappelling off a sketchy anchors
For rappelling anchors the same rules apply as for "normal" climbing anchors: Never rely on a single bolt or single point of fixation to the wall! The only allowed exceptions are bomber anchors which you are 100% sure (!) they cannot fail. Examples could be sturdy trees or large and stable rocks.
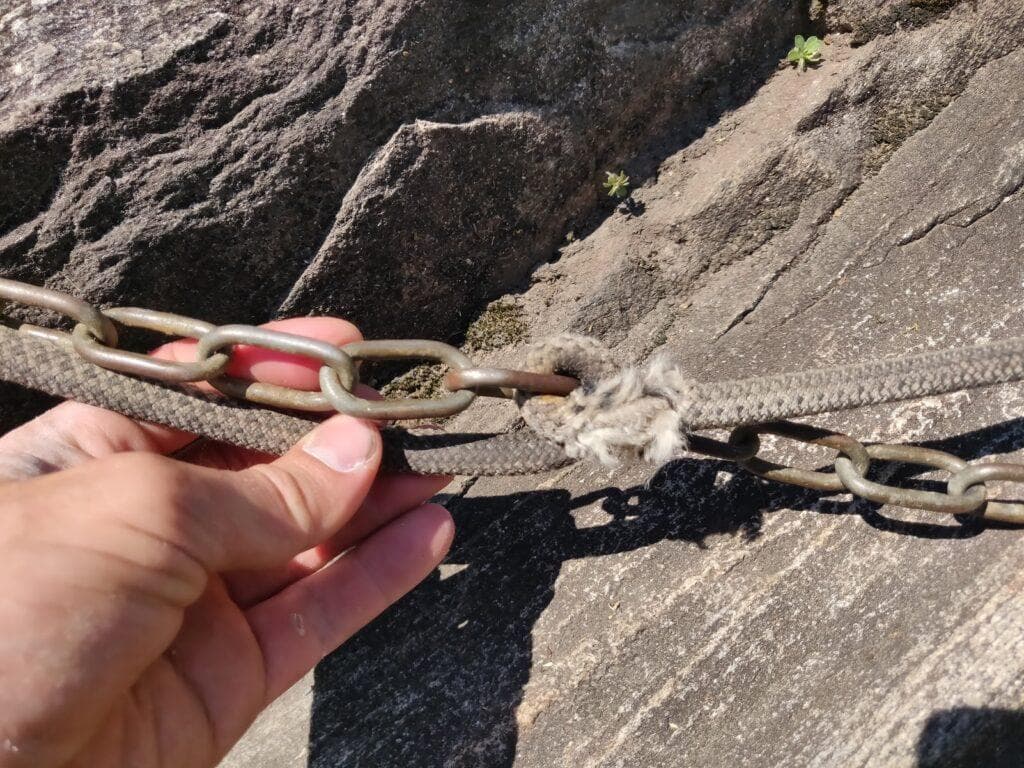
This might not create a problem in well-bolted sport climbing routes where all anchor points are already connected redundantly. However, as soon as you start into alpine routes, rappel anchors can get sketchy. More often than not, some kind of webbing or rope is installed in such anchors, serving as a backup or reinforcement.
How to properly build safe anchors would go way beyond this article, we are going to cover this in separate articles. However, always be sure to carefully inspect any old gear and webbing that was left at the anchor. In the case of doubt, leave some extra gear (it does not cost much). That is why it is so important to always carry some extra accessory cord and spare carabiner.
Also, check out this article from Black Diamond's QC Lab who investigates the impact of UV light and weather on slings and webbing:
"Gear Doesn't Last Forever - Slings and Quickdraws"
| ⚠️ Rule #5 | Always carefully inspect the anchor. In case of doubt, install some backup gear. |
Which anchor points would you still trust?
Walking off is often better
So let's recap, sticking to these 5 simple rules will make your rappeling much safer:
- Always tie a stopper knot in both ends of the rope(s).
- Always use a friction hitch to backup your belay system.
- Always extend your rappel system. Make sure that your friction hitch is not allowed to run into your belay device.
- Always load test your rappel setup.
- Always carefully inspect the anchor. In case of doubt, install some backup gear.
But do you know what is even safer many times? Just walking down, if there is an option to do so. It is safer for you (no possibilities to make all the mistakes above), it is safer for people around you (no way to send rocks down the route) and more often than not it is the faster way to get down.
Need some visual support?
You might be already aware that I am a huge fan of the Ortovox Safety Academy videos. So check their video on rappelling (and also check our article covering the full Ortovox Safety Academy Rock Lab):
Also, do not miss this well-done video from REI, covering most of the rules mentioned above:
Looking for something more extensive? The video from the American Alpine Club AAC is a bit longer, providing more background information on the individual steps of the rappel process:
In any case, have fun and stay safe!